Start with an empty soda bottle...you can use any size, but for our purposes here, we are using the 2 litre size. Make sure it is clean...I wash it out with hot soapy water, rinse, and then insert a couple of paper towels and shake the bottle to get out excess water. Later, when you cut the bottle open, you can wipe out any excess water that is missed.
 Next...
Lay the bottle on it's side and you can draw with a marker the size opening you want. The trick is, you want it big enough to slide your items in, but not to big as it creates an opening that is harder to seal. For the final result, you want to make it look like the bottle is intact.
 Your next step is to cut the opening...I start it by making a slit in the bottle with either a kitchen knife or a seam ripper. This will get it started...then you can use scissors to finish cutting it open. I find a smaller pair of scissors works best for me.
 Now you have your opening...you can gently bend back the flap so you can easily work inside the bottle.
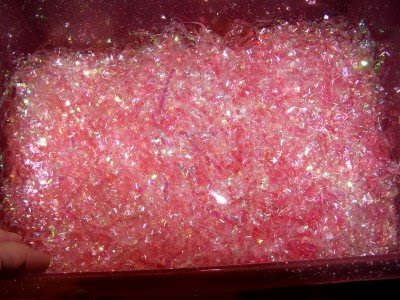
 At this time, I add my "filler" to the bottom and top of the bottle to "cushion" the other items I will be putting in. My favorites to use are easter grass...not the really slick kind put the "prism grass" version. This is the same stuff they sell year round as gift basket fillers and such. But you can hit the after Easter sales and stock up on this for very little money....
Or another filler could be decorative tissue papers...but really, just use your imagination...I think a kids bottle using simple balloons would be cute and colorful!!
 (I buy lots of the colorful grass on sale and put it in tubs by color......great to use for lots of gift ideas.)
The sky is the limit for ideas for items to place in your bottle...below are just some sample ideas.
Candies are great....you can do theme bottles, for example: a spa bottle filled with the small samples of body lotion, shower gels, scrubs, mini nail polishes, a scented votive and maybe a great tea for them to relax with. Or what about a tea and cookie bottle...just find things that are small enough for the bottle and have fun with creating fun gifts for your friends.
Candies are great....you can do theme bottles, for example: a spa bottle filled with the small samples of body lotion, shower gels, scrubs, mini nail polishes, a scented votive and maybe a great tea for them to relax with. Or what about a tea and cookie bottle...just find things that are small enough for the bottle and have fun with creating fun gifts for your friends.
 When placing items in your bottle...you can individually wrap them, or leave them loose to be seen through the bottle. I usually do a combination....wrapping small gifty items and putting in loose candies to be scene through th bottle and add to the festive look of it.
After all your items are in..... I use the clear packing tape to seal the bottle, I just use a few pieces of the tape to get the flap secured back in place as I will be covering the opening with the mailing label that I will make next.
 For your mailing label, you want something big enough to cover the opening and be a bit larger to really help conceal it. Think the size of a large index card. You can use index cards, scrapbook papers, etc to make the label...have fun with it, rubber stamp it, use stickers etc.
Now, neatly tape the lable over the opening. I tape all the way around the bottle in three strips...top, center, bottom of the label...this way it is completely sealed. And it adds to the look that the bottle was never "opened".
 After the label is taped on....what to do about the bottle top? You can just screw the lid on tight and leave it at that. Or you can decorate it too. I take strips of tissue paper and hot glue them around the top of the bottle. When it is all attached, I go over it totally with the hot glue to make it look like a wax seal is on it....while the glue is hot, you can sprinkle it with gold, silver or pearl seed beads for a pretty look. Whatever you decide.....
Then you have your finished bottle...TA DA!!! They can be mailed "as is"....such a fun gift. I have had friends that delivered these to friends in the hospital or as a teacher's gift with lots of balloons tied to the top... Another filler idea is to fill with candy and a gift certificate or gift card.
Notice on the one I did for this tutorial...I used tissue paper in the the bottom of the bottle...but finished filling with the prism shreds.

Debbie
If you have any questions...just write me at: dailygrace@bellsouth.net


 'This blog invests and believes in the PROXIMITY - nearness in space, time and relationships. These blogs are exceedingly charming. These kind bloggers aim to find and be friends. They are not interested in prizes for self-aggrandizement! Our hope is that when the ribbons of these prizes are cut, even more friendships are propogated. Please give more attention to these writers!'
 Just know that I am not totally ignoring book discussions here. There are several on my reading list that I want to talk about here at some point and will want to know what you think!!!


 Yes, I stole this picture from The Nester's blog....you can click on it and it will take you directly to her post about this.
 (From Stephanie's Between The Vines open house)


 Cute, isn't it??? And the instructions are so darn easy...I thought this would make a perfect little "extra" gift for my mom. Here is the fabric I picked out....
 I also have a set of "Mood Swings" dolls to make too.....can someone order up just a few more hours in our days till Christmas?????


 This was a couple from Soddy Daisy, TN...she had really cute snowman buckets that were painted.


 Ok...I admit this didn't look promising to begin with!!! LOL We shared this room with two other vendors..so we divided the space up and began putting our booth together...

 I didn't think the booth turned out to bad considering this is the first time that Hope and I have done a road trip and pulled it together at the last minute to do this set up!!!
 It was a great day...and I will share photos of some of my friends and their booths tomorrow!!!
 So we stop at Taco Bell for caffiene fortification....and then hit the road. As we are driving through a small town not far from home...Zach (who is driving) says, "You did see the ostrich didn't you?" To which I am thinking...what the heck did they put in his soda????? LOL
 We finally made it to our hotel room at the Comfort Inn....we loved this place, staff was great, room was wonderful and the bed was really comfy!!!

 I plan to take lots of pictures and hopefully, have some great "stories" to tell from the weekend!!! My son has a new I-Phone and promises with it's GPS we will be able to get there with no problems....yeah, I have heard that before!!! LOL


